Sunday, December 18, 2016

Excel VBA wait until typing is finished

Assume that you have an ActiveX textbox (or any input control that accepts typing text) in your user-form or work-sheet that will be used for instant search or filter. This instant search will be called from the event handler of textbox change. When the user is typing too fast in this textbox the search command will be triggered so fast as well which may cause the application screen to flash multiple times or slow down.

Consider this example: the user want to search for "123", the normal code will search for "1" when "1" is typed, search for "12" when "2" is typed, and finally search for "123" when "3" is typed.  This leaded to three search commands while the required is only one search command. For large data sets, this will be a huge problem.

So, how to make the application understands that fast typing is finished and it has to start the search?
The answer is: when the textbox text changes; start a small timer function after which the search will start. If the user is typing too fast, the new timer will overwrite the last one before it has been ended. In other words, the timer will be reset each time the user is typing.

This post answer the question asked in http://www.mrexcel.com/forum/excel-questions/682986-my-textbox-change-reacts-too-quickly.html

To apply this concept, write the following code in a module

' Test whether you are using the 64-bit version of Office 2010.
#If Win64 Then
   Declare PtrSafe Function GetTickCount64 Lib "kernel32" () As Long
#Else
   Declare PtrSafe Function GetTickCount Lib "kernel32" () As Long
#End If
 
' Define timer sub that will wait for 1000 milliseconds
Sub WaitTyping()
t1 = GetTickCount()
Do Until (GetTickCount() - t1) > 1000
DoEvents
Loop
End Sub

Write this code inside the textbox change event handler
 
Private Sub SearchTextBox_Change()
WaitTyping    ' We defined this function in module
SearchForText     ' Search will be done after 1000 millisecond
End Sub


Tags:

Excel VBA delay function

Excel VBA instant search textbox speed

Excel VBA wait until user has finished typing

Excel VBA instant search slow response

Excel VBA instant search trick

Improve Excel VBA instant search performance

Excel VBA smart instant search

Tuesday, December 13, 2016

Storing hidden data to Excel

Assume you are creating an Excel workbook  for commercial use and you want to store some hidden data related to installation date, license period, license key, No. of licenses, Licensed users, user password etc. Also you want to have some of these data configurable like user password that can be changed later by the user. Then you have to save these data to hidden (invisible) locations within the workbook so the user can't edit or copy.  Explicitly, the workbook is only protected using three protection modes:

[1] Workbook protection
[2] Sheet protection
[3] VBA project protection

For this reason, any kind of protection schemes you will make, will always rely on one or more of the previous protection modes. The following help article from Microsoft about the document inspector shows the most possible locations for storing hidden data:
https://support.office.com/en-gb/article/Inspect-workbooks-for-hidden-data-and-personal-information-c794c108-b592-4955-b573-90b18dc29afc

The following are some ways to store and protect these hidden data:

[1] Save value to predefined random cell. Set cell format to custom ";;;" so it will not be visible. Lock cell from being selected and protect sheet. Protect VBA project with a password

[2] Save data to a column or row, hide column or row, protect the sheet, protect VBA project with a password

[3] Insert shape, place it in a random place, set its fill and line colors to transparent (no fill), set its Alt text title or body to your value, and/or resize your shape to 0 width and 0 height. Lock shape for editing. Protect sheet, Protect VBA project as well

[4] If your sheet has shapes, then you can store data to a shape and place it in the back of another shape using the previous method

[5] Insert sheet, write your data to this sheet, then hide it. Protect workbook so it is not possible to unhide this sheet. Protect VBA project with a password

[6] Insert sheet, write your data to this sheet, then hide it by on the following ways:

(A) Programmatically using Excel VBA by setting the visibility of this sheet to "xlSheetVeryHidden".
(B) Select your sheet, select developer tab, in the "Controls" group, click "properties", and set the "Visible" property to "xlSheetVeryHidden".

You don't need to protect workbook because it will not be visible even the user unhide all sheets. It can only set back to visible programmatically from VBA. Protect VBA project with a password

[7] Insert sheet, write each character of password in a predefined random cell, hide sheet, lock workbook. Protect VBA project with a password

[8] Save password in any hidden place with complex encryption scheme of your own

[9] Save data in data validation input message title or body or error message title or body of predefined random cell

[10] Save data in screen tip of hyperlinked cell (the hyperlink is set to the cell itself) predefined random cell

[11]  Insert dialog sheet , insert form control outside the user dialog and place it in a random far place, hide the dialog sheet, protect sheet, protect workbook, and protect the VBA project.

[12] Use N formula which can stores data in cell without being seen, lock sheet, and protect the VBA project.

[13] Using work sheet custom properties.


' Save owner name
 
Sheets("Sheet Name").CustomProperties.Add Name:="Owner",Value:= "Shady Mohsen"
 
' Get owner name
Debug.print Sheets("Sheet Name").CustomProperties.Item(1).Value


Tags:

Save hidden data to Excel workbook

Create commercial Excel workbooks

Save data to hidden locations inside workbook


Friday, December 9, 2016

Excel VBA unique function

There is no built-in Excel function that can return unique values of range or array of values. In this post I will show the easiest method that can return unique values of array or range.

Consider the following example: In Range("A1:A10") we have 10 strings and we want to write the unique ones in column "B". Hereunder the code:


Private Sub GetUniqueValues()

UniqueValues = "-"      ' Delimited string. Delimiter "-" which used as a bullet. You may use different delimiter

' ########### Get unique values from range("A1:A10") ##############
For i = 1 To 10
If InStr(UniqueValues, "-" + CStr(Cells(i, 1))+"-") < 1 Then     ' If cell value is not found in the unique values delimited string then add it
UniqueValues = UniqueValues + CStr(Cells(i, 1))+"-"
End If
Next i

' Create the array of unique values
UniqueArray = Split(mid(UniqueValues,1,len(UniqueValues)-1), "-")

' Write unique values to column "B"
Application.ScreenUpdating = False
For i = 1 To UBound(UniqueArray)
Cells(i, 2) = UniqueArray(i)
Next i
Application.ScreenUpdating = True

Debug.Print UBound(UniqueArray)     'Print down number of unique values in the immediate window
End Sub
 
This method has the following Pros and Cons...


Pros:

[1] This method is one of the easiest methods to get unique values
[2] It works for both strings, numbers, or mixed data of strings and numbers
[3] The best solution to populate lists of combo boxes and list boxes
[4] You may make a little modification to code to ignore case-sensitive and extra leading/trailing/in-between blanks easily. The code -after modification- will look like the following
[5] Easily, you can count number of unique values
[6] It can be used to highlight unique values


Private Sub GetUniqueValues()

UniqueValues = "-"      ' Delimited string. Delimiter "-" which used as a bullet. You may use different delimiter

' ########### Get unique values from range("A1:A10") ##############
For i = 1 To 10
If InStr(UCase(UniqueValues), "-" + UCase(Trim(Cstr(Cells(i, 1))))+"-") < 1 Then     ' If cell value is not found in the unique values delimited string then add it
UniqueValues = UniqueValues+ Trim(Cstr(Cells(i, 1)))+"-"
End If
Next i

' Create the array of unique values
UniqueArray = Split(mid(UniqueValues,1,len(UniqueValues)-1), "-")

' Write unique values to column "B"
Application.ScreenUpdating = False
For i = 1 To UBound(UniqueArray)
Cells(i, 2) = UniqueArray(i)
Next i
Application.ScreenUpdating = True

Debug.Print UBound(UniqueArray)     'Print down number of unique values in the immediate window
End Sub

Cons:


[1] As it relies on string processing, this method is not the fastest or the optimum for computer resources
[2] It may not work or it may get slower with large data sets having large number of unique values
[3] The delimiter should be carefully selected to make sure that no character will be processed as delimiter. For example, you can not use the "-" delimiter to get unique values of array of negative numbers.


Tags:


Excel VBA unique function

Excel VBA get unique strings

Excel VBA get unique values

Excel VBA get unique numbers

Excel VBA simplest unique function

Excel VBA shortest unique function

Excel VBA easiest unique function

Excel VBA how to get unique values

Excel VBA count unique values

Excel VBA number of unique values

Saturday, November 12, 2016

Save hierarchy data in Excel

In this post, I am going to show different ways of storing hierarchal data in Excel if these data are going to be used to generate tree views or dynamic filters or data validation lists using either Excel formulas or VBA.

Why we need this?
Because Excel is a spreadsheet processing software and is not a relational database software like MS Access or SQL. Therefore, it is not straight forward to save relational data in Excel.

In this tutorial some methods may be easy and some may be difficult and you will at the end pick the method that meets your requirements.

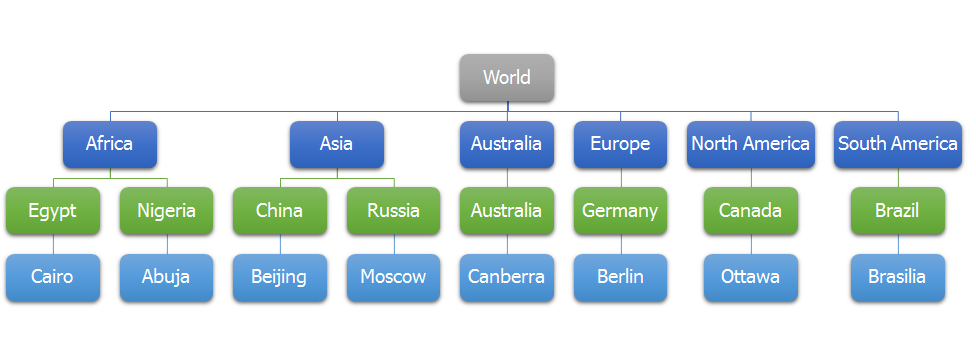
Consider the following hierarchy chart that I'll use to demonstrate the different methods we will use.


Method 1:

First of all, you will need to resize column width for the whole sheet to a smaller size, so this width is the indent size of the tree level. Optionally, you can fill the left border to connect elements in the same level (sub-category) to get better-looking and well-understood hierarchy. If you want to insert element in any sub-category, you will insert a row. Similarly, if you want to delete element, then you will delete the row.


 Method 2:

It has the same structure of method 1, but without resizing the columns and without using the left border. As you can see in the image below, this method is not visually-comfortable to deal with.


Method 3:

This method depends mainly on merging of cells  (see the image below). It requires a professional programming requirements to process data using Excel VBA. Also, it is not easy and straight forward to add or delete elements because a lot of merging and unmerging is required. No doubt, this method has a well-understood and compact layout.


Method 4:

In this method, all data will be saved in only one cell. Each element will be written in a separate line using (Alt+Enter) keys and the level of the element is decided by the number of tabs (Tab = 5 spaces) before it. To process this data a string processing procedure is needed in VBA.


Method 5:

This method is mainly used for processing data using Excel VBA. The greatest advantage of this method that you can write data in different places within the sheet, different worksheets, or different workbooks. Each element will have hyperlink to the range having its sub-elements. The most annoying drawback of this method is: if you inserted or deleted rows you have to edit the affected hyperlinks


Method 6:

This method also is so similar with method number 5, but it uses named ranges instead of hyperlinks. For example the sub-elements of "World" will be defined as "World.Countries" named range. In the same way, the sub-elements of "Africa" will be defined as "Africa.Countries" named range and so on. It is easy to add or remove elements to named ranges using VBA.

Method 7:

With excellent VBA programming skills, this method is the best. If you want to edit data visually using the smart art hierarchy feature in MS office, then you need to process data using VBA.


The following are some codes that will help


Sub ReadWorldHierarchy()

Dim WorldHierarchy As SmartArt
Set WorldHierarchy = ActiveSheet.Shapes("Diagram 1").SmartArt

' Count total number of nodes in the smart art [Answer = 23]
Debug.Print WorldHierarchy.AllNodes().Count

'Count number of nodes in the first level (World). [Answer = 1 point]
Debug.Print WorldHierarchy.Nodes().Count

'Count number of nodes populated from "World" node [Answer = 6 points]
Debug.Print WorldHierarchy.AllNodes(1).Nodes().Count

'Count number of nodes populated from "Africa" node (node No. 2) [Answer = 2 points]
Debug.Print WorldHierarchy.AllNodes(2).Nodes().Count

' Get country names under "Africa" node
For i = 1 To WorldHierarchy.AllNodes().Count
If WorldHierarchy.AllNodes(i).TextFrame2.TextRange.Text = "Africa" Then
For j = 1 To WorldHierarchy.AllNodes(i).Nodes().Count
Debug.Print WorldHierarchy.AllNodes(i).Nodes(j).TextFrame2.TextRange.Text
Next j
End If

Next i

End Sub

I hope it will help :)

Wednesday, November 2, 2016

Excel VBA drag control by mouse

In some cases you may need to drag a frame or any ActiveX control by mouse within the user form. This can be easily done by implementing the following code.


' Declare shared variables that will be used in different subs
Dim XOld, YOld As Single
Dim DragStart As Boolean

Private Sub UserForm_Initialize()
DragStart = False
End Sub

Private Sub Frame1_MouseDown(ByVal Button As Integer, ByVal Shift As Integer, ByVal X As Single, ByVal Y As Single)
If Button = 1 Then     'If the left mouse key button is pressed on the frame, then start the drag behaviour
DragStart = True
XOld = X
YOld = Y
End If
End Sub

Private Sub Frame1_MouseMove(ByVal Button As Integer, ByVal Shift As Integer, ByVal X As Single, ByVal Y As Single)
If DragStart = True Then
Frame1.Left = Frame1.Left + (X - XOld)     'Move in X direction with the corresponding displacement in X
Frame1.Top = Frame1.Top + (Y - YOld)     'Move in Y direction with the corresponding displacement in Y
End If
End Sub

Private Sub Frame1_MouseUp(ByVal Button As Integer, ByVal Shift As Integer, ByVal X As Single, ByVal Y As Single)
If Button = 1 Then
DragStart = False     'If mouse key released then stop drag behaviour
End If
End Sub


Tags:

Excel VBA drag control by mouse

Excel VBA drag frame by mouse left click

Excel VBA drag ActiveX control using mouse

Excel VBA drag and drop

Monday, October 31, 2016

Slow internet connection because of windows 10 update

I had faced for some days very slow internet connection (my internet speed is 1 Mb/sec) and I discovered that it is slow because of Windows 10 updates (Windows update download speed was 0.9 Mb/sec). In Windows 10 you cannot stop updates at all even using the task manager, but there is an alternative way just in 3 steps:

[1] Open the start menu and search for "WiFi" and open "Change WiFi settings" to get the following window.


[2] Select "Manage known networks" (highlighted in red box in the image above). A list of networks will be displayed as follows.

[3] Select the network you want and click "Properties" button to get a window like the shown below. Finally, turn on "Set as metered connection" button (shown in the red box below). Now, you will not have slow internet connection anymore (for this network only) because of windows 10 update.


Tags:

Problem: Windows 10 slow internet connection

Window 10 slow internet speed because of Windows update

Windows 10 force stop Windows update

Windows 10 force stop delivery optimization service

Windows 10 cannot stop Windows update

Sunday, October 30, 2016

Excel VBA parallel timers

Excel VBA does not support multi-threading or running parallel loops. For this reason, if you want to run stop watches or timers at the same time, then you have to run them in the same loop.

You can run/stop each stopwatch individually by pressing the button below each stopwatch counter as seen in the picture below.


The button "All" is used to run/stop all stopwatches at the same time, so you can see if there is any delay between stopwatches or not.


The following is Excel VBA code for the previous demo of 4 stop watches:

Option Explicit
Private Declare Function GetTickCount Lib "kernel32" () As Long
 
Dim StopWatch1, StopWatch2, StopWatch3, StopWatch4, TimerLoopStatus, AllTimersOn As Boolean
Dim t1start, t2start, t3start, t4start, t5start As Long
 
Private Sub UserForm_Initialize()
 
' The following are the default values at userform start
StopWatch1 = False
StopWatch2 = False
StopWatch3 = False
StopWatch4 = False
AllTimersOn = False
 
TimerLoopStatus = False
 
End Sub
 
Private Sub StopWatchAllBtn_Click()
 
AllTimersOn = True
 
StopWatch1Btn_Click
 
StopWatch2Btn_Click
 
StopWatch3Btn_Click
 
StopWatch4Btn_Click
 
MultipleTimers     'Run timers loop
 
End Sub
 
Private Sub StopWatch1Btn_Click()
 
t1start = GetTickCount
 
If StopWatch1 = False Then      'If stop watch is off, then turn it on
StopWatch1 = True
StopWatch1Btn.Caption = "Stop"
StopWatch1Btn.BackColor = &HFF&
ElseIf StopWatch1 = True Then
StopWatch1 = False
StopWatch1Btn.Caption = "Start"
StopWatch1Btn.BackColor = &HC000&
End If
 
If TimerLoopStatus = False And AllTimersOn = False Then
MultipleTimers     'Run timers loop
End If
 
End Sub
 
Private Sub StopWatch2Btn_Click()
 
t2start = GetTickCount
 
If StopWatch2 = False Then      'If stop watch is off, then turn it on
StopWatch2 = True
StopWatch2Btn.Caption = "Stop"
StopWatch2Btn.BackColor = &HFF&
ElseIf StopWatch2 = True Then
StopWatch2 = False
StopWatch2Btn.Caption = "Start"
StopWatch2Btn.BackColor = &HC000&
End If
 
If TimerLoopStatus = False And AllTimersOn = False Then
MultipleTimers
End If
 
End Sub
 
Private Sub StopWatch3Btn_Click()
 
t3start = GetTickCount
 
If StopWatch3 = False Then      'If stop watch is off, then turn it on
StopWatch3 = True
StopWatch3Btn.Caption = "Stop"
StopWatch3Btn.BackColor = &HFF&
ElseIf StopWatch3 = True Then
StopWatch3 = False
StopWatch3Btn.Caption = "Start"
StopWatch3Btn.BackColor = &HC000&
End If
 
If TimerLoopStatus = False And AllTimersOn = False Then
MultipleTimers
End If
 
End Sub
 
Private Sub StopWatch4Btn_Click()
 
t4start = GetTickCount
 
If StopWatch4 = False Then      'If stop watch is off, then turn it on
StopWatch4 = True
StopWatch4Btn.Caption = "Stop"
StopWatch4Btn.BackColor = &HFF&
ElseIf StopWatch4 = True Then
StopWatch4 = False
StopWatch4Btn.Caption = "Start"
StopWatch4Btn.BackColor = &HC000&
End If
 
If TimerLoopStatus = False And AllTimersOn = False Then
MultipleTimers
End If
 
End Sub
 
 
Private Sub MultipleTimers()
 
Do While StopWatch1 = True Or StopWatch2 = True Or StopWatch3 = True Or StopWatch4 = True
 
If StopWatch1 = True Then
Label1.Caption = Round((GetTickCount - t1start) / 1000, 3)
End If
 
If StopWatch2 = True Then
Label2.Caption = Round((GetTickCount - t2start) / 1000, 3)
End If
 
If StopWatch3 = True Then
Label3.Caption = Round((GetTickCount - t3start) / 1000, 3)
End If
 
If StopWatch4 = True Then
Label4.Caption = Round((GetTickCount - t4start) / 1000, 3)
End If
 
DoEvents
Loop
 
TimerLoopStatus = False     'When the loop finishes, then the multiple timer status will be "False" (off)
 
AllTimersOn = False
 
End Sub


Enjoy...

Tuesday, October 25, 2016

Cascaded thermoelectric (Peltier) modules

A lot of engineers are impressed with thermoelectric (Peltier) coolers and most of them thought about getting ultimate freezing (negative) temperatures. Thermoelectric cooler -conceptually- is a heat pump, so it takes electric power and pump heat from one side (source) to the other side (sink).

To get ultimate negative temperatures, you have to cascade Peltier module on the top of another, but how this will work. The first principle is: the dissipated heat of thermoelectric module from the hot side is the summation of the input electric power and the absorbed heat from the cold side. Therefore, the dissipated heat is always large and around 3 times the absorbed heat.

So... when stacking Peltier modules on top of another, you have to make sure that the dissipated heat of the top one is less than or equal the cooling power of the lower one. You can stack different Peltier modules of different sizes in pyramid layout from largest size in the bottom to smallest size on the top.


Also, you can stack Peltier modules of different cooling powers but with the same size. The following is a list of Peltier modules that have the same size, but different cooling powers:


If there are no more options for Peltier modules in your country (one model only is available in your country), then you can use array layout for cascading them like the image below:


Tags:

Cascaded thermoelectric (Peltier) modules|elments|tiles

Thermoelectric (Peltier) cooler on the top of another

Thermoelectric (Peltier) stacking

Minimum thermoelectric (Peltier) cooler temperature

Ultimate cooling|freezing temperature in thermoelectric (Peltier) cooler

Dissipated heat of thermoelectric (Peltier) modules|elments|tiles

Heat sink power of thermoelectric (Peltier) modules|elments|tiles

Thermoelectric (Peltier) modules|elments|tiles in Egypt