In this post, I am going to show different ways of storing hierarchal data in Excel if these data are going to be used to generate tree views or dynamic filters or data validation lists using either Excel formulas or VBA.
Why we need this?
Because Excel is a spreadsheet processing software and is not a relational database software like MS Access or SQL. Therefore, it is not straight forward to save relational data in Excel.
In this tutorial some methods may be easy and some may be difficult and you will at the end pick the method that meets your requirements.
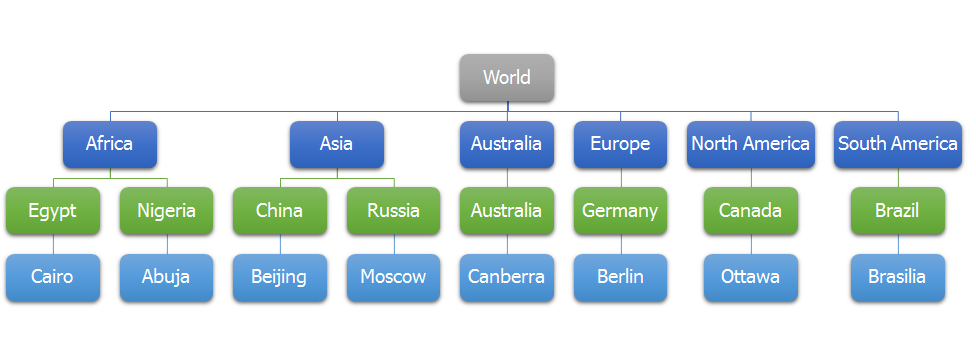
Consider the following hierarchy chart that I'll use to demonstrate the different methods we will use.
Method 1:
First of all, you will need to resize column width for the whole sheet to a smaller size, so this width is the indent size of the tree level. Optionally, you can fill the left border to connect elements in the same level (sub-category) to get better-looking and well-understood hierarchy. If you want to insert element in any sub-category, you will insert a row. Similarly, if you want to delete element, then you will delete the row.

Method 2:
It has the same structure of method 1, but without resizing the columns and without using the left border. As you can see in the image below, this method is not visually-comfortable to deal with.

Method 3:
This method depends mainly on merging of cells (see the image below). It requires a professional programming requirements to process data using Excel VBA. Also, it is not easy and straight forward to add or delete elements because a lot of merging and unmerging is required. No doubt, this method has a well-understood and compact layout.

Method 4:
In this method, all data will be saved in only one cell. Each element will be written in a separate line using (Alt+Enter) keys and the level of the element is decided by the number of tabs (Tab = 5 spaces) before it. To process this data a string processing procedure is needed in VBA.

Method 5:
This method is mainly used for processing data using Excel VBA. The greatest advantage of this method that you can write data in different places within the sheet, different worksheets, or different workbooks. Each element will have hyperlink to the range having its sub-elements. The most annoying drawback of this method is: if you inserted or deleted rows you have to edit the affected hyperlinks

Method 6:
This method also is so similar with method number 5, but it uses named ranges instead of hyperlinks. For example the sub-elements of "World" will be defined as "World.Countries" named range. In the same way, the sub-elements of "Africa" will be defined as "Africa.Countries" named range and so on. It is easy to add or remove elements to named ranges using VBA.


The following are some codes that will help
I hope it will help :)
Why we need this?
Because Excel is a spreadsheet processing software and is not a relational database software like MS Access or SQL. Therefore, it is not straight forward to save relational data in Excel.
In this tutorial some methods may be easy and some may be difficult and you will at the end pick the method that meets your requirements.
Consider the following hierarchy chart that I'll use to demonstrate the different methods we will use.
Method 1:
First of all, you will need to resize column width for the whole sheet to a smaller size, so this width is the indent size of the tree level. Optionally, you can fill the left border to connect elements in the same level (sub-category) to get better-looking and well-understood hierarchy. If you want to insert element in any sub-category, you will insert a row. Similarly, if you want to delete element, then you will delete the row.
Method 2:
It has the same structure of method 1, but without resizing the columns and without using the left border. As you can see in the image below, this method is not visually-comfortable to deal with.
Method 3:
This method depends mainly on merging of cells (see the image below). It requires a professional programming requirements to process data using Excel VBA. Also, it is not easy and straight forward to add or delete elements because a lot of merging and unmerging is required. No doubt, this method has a well-understood and compact layout.
Method 4:
In this method, all data will be saved in only one cell. Each element will be written in a separate line using (Alt+Enter) keys and the level of the element is decided by the number of tabs (Tab = 5 spaces) before it. To process this data a string processing procedure is needed in VBA.
Method 5:
This method is mainly used for processing data using Excel VBA. The greatest advantage of this method that you can write data in different places within the sheet, different worksheets, or different workbooks. Each element will have hyperlink to the range having its sub-elements. The most annoying drawback of this method is: if you inserted or deleted rows you have to edit the affected hyperlinks
Method 6:
This method also is so similar with method number 5, but it uses named ranges instead of hyperlinks. For example the sub-elements of "World" will be defined as "World.Countries" named range. In the same way, the sub-elements of "Africa" will be defined as "Africa.Countries" named range and so on. It is easy to add or remove elements to named ranges using VBA.
Method 7:
With excellent VBA programming skills, this method is the best. If you want to edit data visually using the smart art hierarchy feature in MS office, then you need to process data using VBA.
Sub ReadWorldHierarchy()
Dim WorldHierarchy As
SmartArt
Set WorldHierarchy =
ActiveSheet.Shapes("Diagram 1").SmartArt
' Count total
number of nodes in the smart art [Answer = 23]
Debug.Print WorldHierarchy.AllNodes().Count
'Count number
of nodes in the first level (World). [Answer = 1 point]
Debug.Print WorldHierarchy.Nodes().Count
'Count number
of nodes populated from "World" node [Answer = 6 points]
Debug.Print WorldHierarchy.AllNodes(1).Nodes().Count
'Count number
of nodes populated from "Africa" node (node No. 2) [Answer = 2
points]
Debug.Print WorldHierarchy.AllNodes(2).Nodes().Count
' Get country
names under "Africa" node
For i = 1 To WorldHierarchy.AllNodes().Count
If WorldHierarchy.AllNodes(i).TextFrame2.TextRange.Text
= "Africa" Then
For j = 1 To
WorldHierarchy.AllNodes(i).Nodes().Count
Debug.Print
WorldHierarchy.AllNodes(i).Nodes(j).TextFrame2.TextRange.Text
Next j
End If
Next i
End Sub
|
I hope it will help :)
No comments:
Post a Comment